🌐 Basic Networking
Pods are both ephemeral and “mortal”, they should be considered effectively transient. Kubernetes can terminate and reschedule pods for a whole range of reasons, including rolling updates, hitting resource limits, scaling up & down and other cluster operations. With Pods being transient, you can not build a reliable architecture through addressing Pods directly (e.g. by name or IP address), because no part of a pod is static.
Kubernetes solves this with Services, which act as a network abstraction over a group of pods, and have their own lifecycle. We can use them to greatly improve what we’ve deployed.
🧩 Deploy MongoDB Service
Now to put a Service in front of the MongoDB pods, if you want to create the service YAML yourself, you can refer to the Kubernetes docs.
- The type of Service should be
ClusterIPwhich means it’s internal to the cluster only. - The service port should be 27017.
- The target port should be 27017.
- Selector decides what pods are behind the service, in this case use the label
appand the valuemongodb.
📝 NOTE: Labels are optional metadata that can be added to any object in Kubernetes, they are simply key-value pairs. Labels can be used to organize and to select subsets of objects. The label “app” is commonly used, but has no special meaning, and isn’t used by Kubernetes in any way
Save your YAML into a file mongo-service.yaml or use the below YAML manifest for the service:
Click here for the MongoDB service YAML
kind: Service
apiVersion: v1

metadata:
  # We purposefully pick a different name for the service from the deployment
  name: database

spec:
  type: ClusterIP
  selector:
    app: mongodb
  ports:
    - protocol: TCP
      port: 27017
      targetPort: 27017
Apply it to the cluster as before:
kubectl apply -f mongo-service.yaml
You can use kubectl to examine the status of the Service just like you can with Pods and Deployments:
# Get all services
kubectl get svc

# Get details of a single service
kubectl describe svc {service-name}
📝 NOTE: The service called ‘kubernetes’ exists in every namespace and is placed there automatically, you can ignore it.
🛑 IMPORTANT NOTE: As a rule it’s a bad idea and generally considered an “anti-pattern” to run stateful services in Kubernetes. Managing them is complex and time consuming. It’s strongly recommended use PaaS data offerings which reside outside your cluster and can be managed independently and easily. We will continue with MongoDB running in the cluster purely as a learning exercise.
📡 Connect the API to MongoDB Service
Now we have a Service in our cluster for MongoDB we can access the database using DNS rather than pod IP and if the pod(s) die or restart or move; this name remains constant. DNS with Kubernetes is a complex topic we won’t get into here, the main takeaway for now is:
- Every Service in the cluster can be resolved over DNS
- Within a Namespace, the Service name will resolve as a simple hostname, without the need for a DNS suffix but other scenarios also are supported.
Edit the the data-api-deployment.yaml file you created previously and change the value of the
MONGO_CONNSTR environmental variable.
Replace the IP address with name of the service, e.g. the connection string should look like mongodb://admin:supersecret@database.
You can update the active deployment with these changes by re-running kubectl apply -f data-api-deployment.yaml.
Kuberenetes will perform a rolling update, if you are quick and run kubectl get pods you might see it taking place, i.e. a new pod starting & the old one terminating.
Again you can check the status and the logs using kubectl.
🌍 Expose the Data API externally
We can create a different type of Service in front of the data API, in order to expose it outside of the cluster and also to the internet.
To do this use a Service with the type NodePort.
This service will then expose the traffic on IP address of the VM and the port specified as nodePort, in our case it’ll be port 30036.
In a traditional cluster, like AKS, we would instead use Service of type LoadBalancer. This then would be picked up by Azure and a public IP assigned and traffic routed through an Azure LoadBalancer in front of the cluster.
With a bare metal cluster there aren’t any load balancers.
📰 INFO: For more information on different service types, you can check out: Kubernetes NodePort vs LoadBalancer vs Ingress? When should I use what? (We’ll touch on ingress in later chapters as well.)
We can also change the port at the Service level, so the port exposed by the Service doesn’t need to match the one that the container is listening on. In this case we’ll re-map the port to 80.
Save your YAML into a file data-api-service.yaml from above or below.
Click here for the data API service YAML
kind: Service
apiVersion: v1

metadata:
  name: data-api

spec:
  type: NodePort
  selector:
    app: data-api
  ports:
    - protocol: TCP
      port: 80
      targetPort: 4000
      nodePort: 30036
Apply it to the cluster as before:
kubectl apply -f data-api-service.yaml
Using kubectl get svc check the status. Then go to the address in your browser http://{VM_IP}:30036/api/info/ and you should get the same JSON response as before.
Clearly this is better than what we had before, but in production you would never expose traffic directly into your pods like this. Later we can improve this yet further, but for now it will suffice.
📝 NOTE: If your connection is timing out, make sure that the port is exposed on your VM.
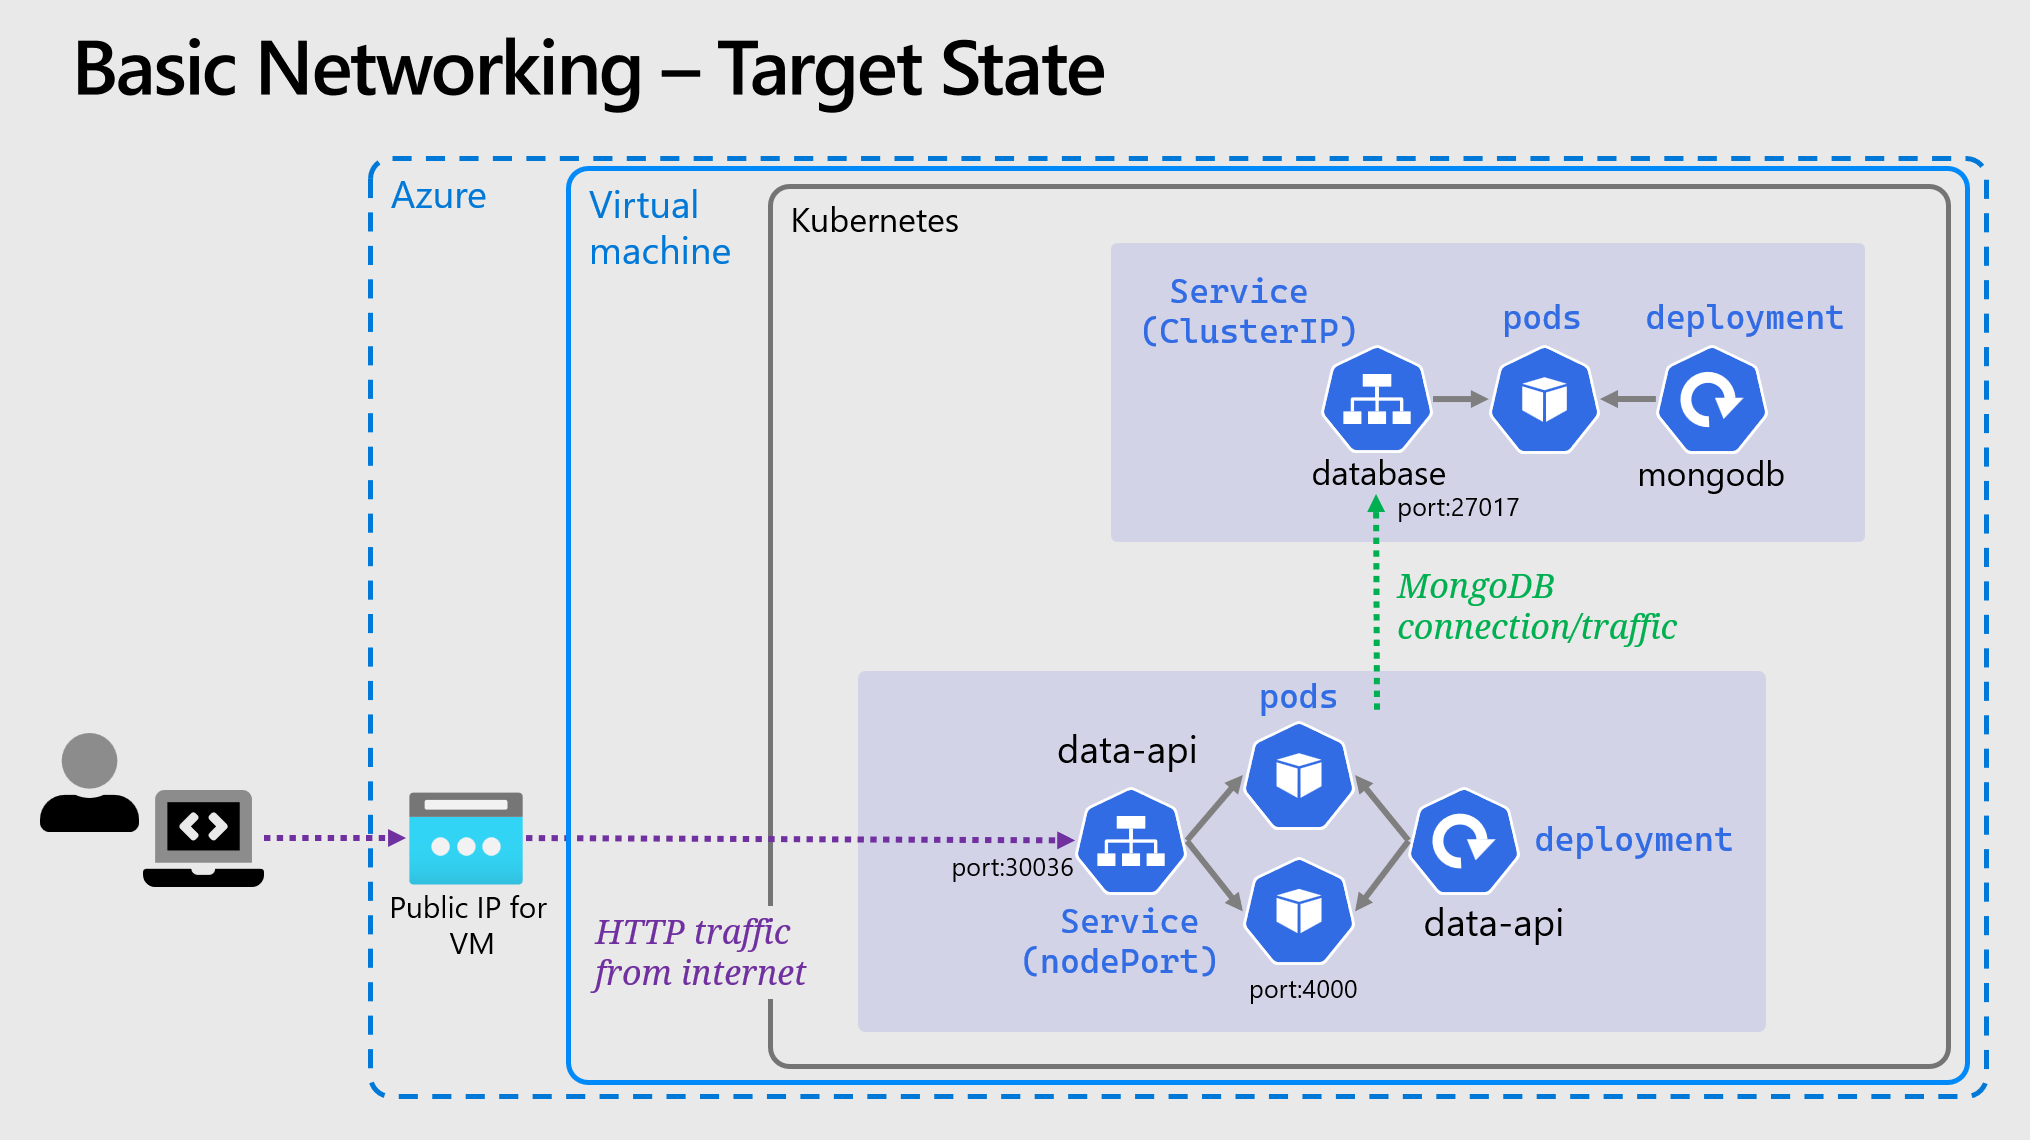
🖼️ Cluster & Architecture Diagram
The resources deployed into the cluster & in Azure at this stage can be visualized as follows: