🤯 Scaling, Stateful Workloads & Helm
This final section touches on some slightly more advanced and optional concepts we’ve skipped over. They aren’t required to get a basic app up & running, but generally come up in practice and real world use of Kubernetes.
Feel free to do as much or as little of this section as you wish.
📈 Scaling
Scaling is a very common topic and is always required in some form to meet business demand, handle peak load and maintain application performance. There’s fundamentally two approaches: manually scaling and using dynamic auto-scaling. Along side that there are two dimensions to consider:
- Horizontal scaling: This is scaling the number of application Pods, within the limits of the resources available in the cluster.
- Vertical or cluster scaling: This is scaling the number of Nodes in the cluster, and therefore the total resources available. We won’t be looking at this here, but you can read the docs if you want to know more.
Since the k3s cluster is only running a single node, you’ll only be able to take advantage of horizontal scaling.
Scaling stateless applications manually can be as simple as running the command to update the number of replicas in a Deployment, for example:
kubectl scale deployment data-api --replicas 4
Naturally this can also be done by updating the replicas field in the Deployment manifest and
applying it.
🧪 Experiment: Try scaling the data API to a large number of pods e.g. 50 or 60 to see what happens? If some of the Pods remain in a “Pending” state can you find out the reason why? What effect does changing the resource requests (for example increasing the memory to 600Mi) have on this?
🚦 Autoscaling
Horizontal auto scaling is performed with the Horizontal Pod Autoscaler which you can read about here. In essence it watches metrics emitted from the pods and other resources, and based on thresholds you set, it will modify the number of replicas dynamically.
To set up an Horizontal Pod Autoscaler you can give it a deployment and some simple targets, as follows:
kubectl autoscale deployment data-api --cpu-percent=50 --min=2 --max=10
This command is equivalent to deploying this HorizontalPodAutoscaler resource
kind: HorizontalPodAutoscaler
apiVersion: autoscaling/v1
metadata:
  name: data-api
spec:
  maxReplicas: 10
  minReplicas: 2
  scaleTargetRef:
    apiVersion: apps/v1
    kind: Deployment
    name: data-api
  targetCPUUtilizationPercentage: 50
Run this in a separate terminal window to watch the status and number of pods:
watch -n 3 kubectl get pods
Now generate some fake load by hitting the /api/info endpoint with lots of requests. We use a tool
called hey to do this easily and run 20 concurrent requests for 3 minutes
wget wget https://hey-release.s3.us-east-2.amazonaws.com/hey_linux_amd64
chmod +x hey_linux_amd64
./hey_linux_amd64 -z 180s -c 20 http://{VM_IP}:30036/api/info
After about 1~2 mins you should see new data-api pods being created. Once the hey command completes
and the load stops, it will probably be around ~5 mins before the pods scale back down to their original
number.
🛢️ Improving The MongoDB Backend
There’s two very major problems with our backend database:
- There’s only a single instance, i.e. one Pod, introducing a serious single point of failure.
- The data held by MongoDB is ephemeral and if the Pod was terminated for any reason, we’d lose all application data. Not very good!
🛑 IMPORTANT NOTE: As a rule it’s a bad idea and an “anti-pattern” to run stateful services in Kubernetes. Managing them is complex and time consuming. It’s strongly recommended use PaaS data offerings which reside outside your cluster and can be managed independently and easily. We will continue to keep MongoDB running in the cluster purely as a learning exercise.
We can’t simply horizontally scale out the MongoDB Deployment with multiple Pod replicas as it is stateful, i.e. it holds data and state. We’d create a “split brain” situation as requests are routed to different Pods.
Kubernetes does provide a feature called StatefulSets which greatly helps with the complexities of running multiple stateful services across in a cluster
⚠️ HOWEVER! StatefulSets are not a magic wand - any stateful workload such as a database (e.g. MongoDB), still needs to be made aware it is running in multiple places and handle the data synchronization/replication. This can be setup for MongoDB, but is deemed too complex for this workshop.
However we can address the issue of data persistence.
🧪 Optional Experiment: Try using the app and adding an event using the “Admin” screens, then
run kubectl delete pod {mongo-pod-name} You will see that Kubernetes immediately restarts it.
However when the app recovers and reconnects to the DB, you will see the data you created is gone.
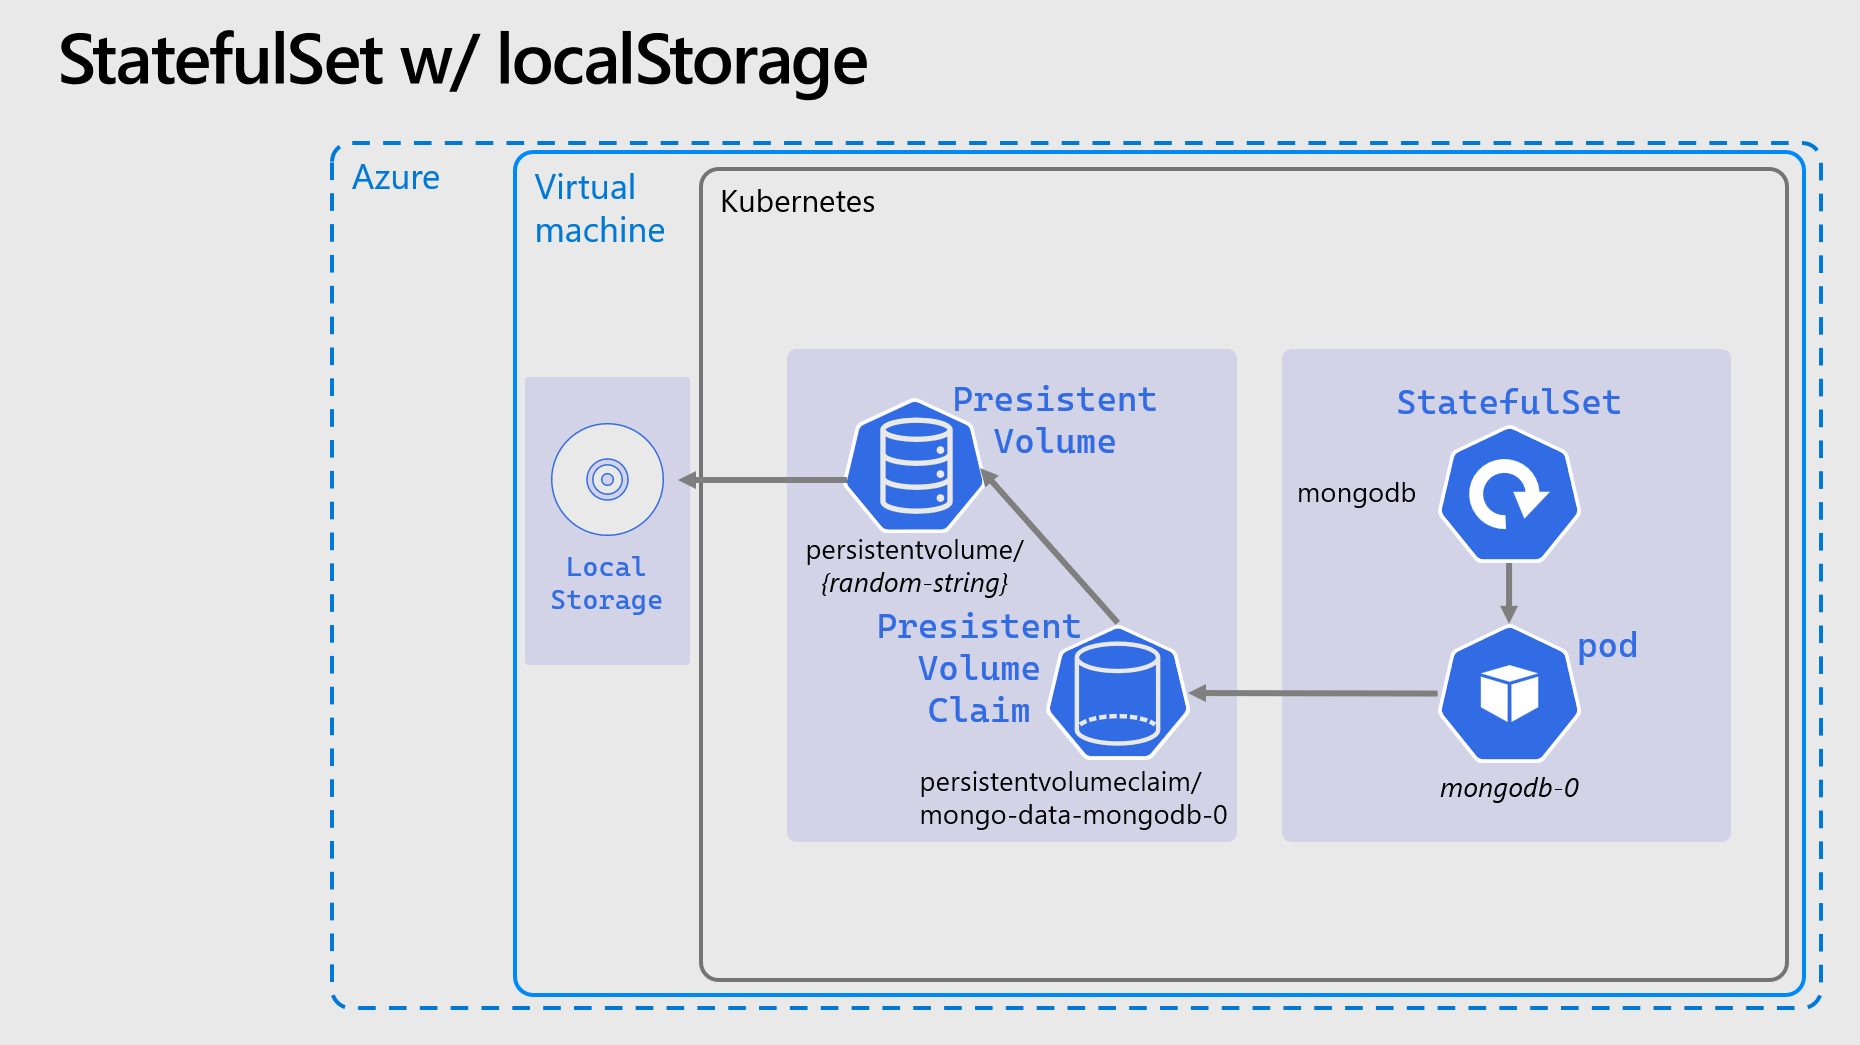
To resolve the data persistence issues, we need do three things:
- Change the MongoDB Deployment to a StatefulSet with a single replica.
- Add a
volumeMountto the container mapped to the/data/dbfilesystem, which is where the mongodb process stores its data. - Add a
volumeClaimTemplateto dynamically create a PersistentVolume and a PersistentVolumeClaim for this StatefulSet. Use the “local-path”StorageClassand request a 500M volume which is dedicated with the “ReadWriteOnce” access mode.
The relationships between these can be explained with this diagram:
PersistentVolumes, PersistentVolumeClaims, StorageClasses, etc. are a deep and complex topics in Kubernetes. If you want begin reading about them there are masses of information in the docs.
However it is suggested for now simply take the YAML below and save it as mongo-statefulset.yaml:
Completed MongoDB StatefulSet YAML manifest
kind: StatefulSet
apiVersion: apps/v1

metadata:
  name: mongodb

spec:
  serviceName: mongodb
  replicas: 1 # Important we leave this as 1
  selector:
    matchLabels:
      app: mongodb
  template:
    metadata:
      labels:
        app: mongodb
    spec:
      containers:
        - name: mongodb-container

          image: mongo:5.0
          imagePullPolicy: Always

          ports:
            - containerPort: 27017

          resources:
            requests:
              cpu: 100m
              memory: 200Mi
            limits:
              cpu: 500m
              memory: 300Mi

          readinessProbe:
            exec:
              command:
                - mongo
                - --eval
                - db.adminCommand('ping')

          env:
            - name: MONGO_INITDB_ROOT_USERNAME
              value: admin
            - name: MONGO_INITDB_ROOT_PASSWORD
              valueFrom:
                secretKeyRef:
                  name: mongo-creds
                  key: admin-password

          volumeMounts:
            - name: mongo-data
              mountPath: /data/db

  volumeClaimTemplates:
    - metadata:
        name: mongo-data
      spec:
        accessModes: ["ReadWriteOnce"]
        storageClassName: local-path
        resources:
          requests:
            storage: 500M
Remove the old deployment with kubectl delete deployment mongodb and apply the new
mongo-statefulset.yaml file. Some comments:
- When you run
kubectl get podsyou will see the pod name ends-0rather than the random hash. - Running
kubectl get pv,pvcyou will see the new PersistentVolume and PersistentVolumeClaim that have been created. The Pod might take a little while to start while the volume is created, and is “bound” to the Pod.
If you repeat the experiment above, you should see that the data is maintained after you delete the
mongodb-0 pod and it restarts.
⛑️ Introduction to Helm
Helm is an CNCF project which can be used to greatly simplify deploying applications to Kubernetes, either applications written and developed in house, or external 3rd party software and tools.
- Helm simplifies deployment into Kubernetes using charts, when a chart is deployed it is refereed to as a release.
- A chart consists of one or more Kubernetes YAML templates + supporting files.
- Helm charts support dynamic parameters called values. Charts expose a set of default values
through their
values.yamlfile, and these values can be set and over-ridden at release time. - The use of values is critical for automated deployments and CI/CD.
- Charts can referenced through the local filesystem, or in a remote repository called a chart repository. The can also be kept in a container registry but that is an advanced and experimental topic.
- To use Helm, the Helm CLI tool
helmis required.
Well add the Helm chart repository for the ingress we will be deploying, this is done with the
helm repo command. This is a public repo and chart of the extremely popular NGINX ingress controller
(more on that below).
💥 Installing The App with Helm
The Smilr app we have been working with, comes with a Helm chart, which you can take a look at here, Smilr Helm Chart.
⚠️ WARNING: This helm chart will deploy the solution with load-balancers, not nodePorts, so it will never be exposed outside of the K3s cluster.
With this we can deploy the entire app, all the deployments, pods, services, ingress, etc. with a single command. Naturally if we were to have done this from the beginning there wouldn’t have been much scope for learning!
However as this is the final section, now might be a good time to try it. Due to some limitations (mainly the lack of public DNS), only one deployment of the app can function at any given time. So you will need to remove what have currently deployed, by running:
kubectl delete deploy,sts,svc,ingress-nginx --all
Fetch the chart and download it locally, this is because the chart isn’t published in a Helm repo:
curl -sL https://github.com/benc-uk/smilr/releases/download/2.9.8/smilr-chart.tar.gz | tar -zx
Create a values file for your release:
registryPrefix: {ACR_NAME}.azurecr.io/

ingress:
  className: nginx

dataApi:
  imageTag: stable
  replicas: 2

frontend:
  imageTag: stable
  replicas: 1

mongodb:
  enabled: true
Save it as my-values.yaml, then run a command to tell Helm to fetch any dependencies. In this case
the Smilr chart uses the Bitnami MongoDB chart.
To fetch/update this simply run:
helm dependency update ./smilr
Finally we are ready to deploy the Smilr app using Helm, the release name can be anything you wish, and you should point to the local directory where the chart has been downloaded and extracted:
helm install myapp ./smilr --values my-values.yaml
Validate the deployment as before with helm and kubectl and check you can access the app in the
browser.